Monday 18 June 2018

Everything you need to know about ISBN numbers

As if self publishing your own book wasn't hard enough - at some point you have to think about ISBN numbers. These confusing collection of seemingly random digits are more important than you think, so I've broken down everything you need to know in a complete, comprehensive guide.

Let's start at the beginning...

What is an ISBN?


ISBN stands for International Standard Book Number. They were 10 digits long, but since 2007 they are now always 13 digits long. While they may look random, they aren't at all and are made using a specific formula that makes them unique to each book.

From here on, we will be referring to the numbers as 'identifiers', because each number identifies something about your book. Bookstores, libraries, publishers and any other buyers use these identifiers to find your book and quickly find out more information they might need.

Each ISBN is split into 5 parts, sometimes separated visually by a hyphen. 
  • The prefix "978" or "979"
  • Country identifier
  • Publisher identifier
  • Title identifier
  • Check digit

You might have seen ISBN numbers that don't quite follow this structure. In those cases, the ISBN numbers have been purchased in bulk, 10,000 or more at a time. Big companies like Amazon do this to redistribute to their clients who self publish through them. The identifiers are the same, but refer to Amazon's details rather than the details of each single book. Buyers can immediately tell by looking at the ISBN whether you have bought the ISBN in bulk as part of a large company, or if it was a single purchase and you are a self publisher. 

Now you know what an ISBN is, the next question is;

Should I buy an ISBN?


There are different options when it comes to ISBNs.


  • Use an ISBN assigned by your publisher 
  • Buy an ISBN yourself
  • Buy a universal ISBN
Each method has it's own pros and cons. To see which one will work best for you, take a look at this breakdown below.

Assigned ISBN from your publisher

Online publishers such as Createspace give you the option to use one of their assigned ISBN numbers. This is often free, or at least the cheapest choice. However you may be limited to where you can distribute your book. The imprint will appear as 'Createspace' rather than your own name. You cannot transfer this ISBN to another publisher if you leave Createspace. If you don't plan to distribute outside of Createspace then this may be a good budget option for you.


Buy your own ISBN

Used by serious and professional authors, this option offers more flexibility than using an assigned ISBN. Your name will appear as the publisher and you can distribute to more channels. If you move to another publisher however, you will have to get a new ISBN


Buy a universal ISBN

Similar to buying your own ISBN above, this option also allows you to have your own name as publisher and distribute to more channels, but furthermore, with a universal ISBN you can move to another publisher and keep the same ISBN.

This option is the most expensive, costing around £90 or $99 USD
You might ask; 'What does it matter if Createspace are listed as the publisher?' Well, you might not mind, but bigger bookshops will not stock books that are listed as published by Createspace. If you're seriously trying to become a best-selling author, using an assigned ISBN could hinder you. 
It's worth noting as well, that you need an ISBN for each format of the book you are publishing, even if it is the same title. Here are some common scenarios which would require a new ISBN.

You add a hardback version = New ISBN
You added a page = New ISBN
You changed the title = New ISBN
You change the price = Same ISBN
You translate into a different language = New ISBN
You correct a spelling error = Same ISBN
You print a large-print format for blind readers = New ISBN

eBooks technically aren't required to have an ISBN number, yet you can still have one if you think you would benefit. They not only give the impression that you are more professional, but also make it easy for resellers and buyers to identify your book and it's details. Some big bookstores will not list your eBook on their site unless it has an ISBN.


Where do I buy my ISBN?


If you choose to use the assigned ISBN, Createspace will offer this when you create your title. But for the other options, you can buy them directly through the only companies who control them; Bowker in the US, and Nielson in the UK.


There are a plenty of third party sites who sell ISBNs, but I would steer clear of them. Not only do they cost more money, but you do not know what identifiers they are really using.

It's also good to know that not only can you save money buying the ISBN numbers directly, but you can get a good discount by buying in bulk too.

Where does my ISBN go?


Now you have your ISBN, you'll want to use it of course! 

Your ISBN should appear on your barcode. When you bought your ISBN they will have provided it as a barcode, so use this file to place onto your book cover. (Or give it to your designer for them to place)

The barcode should be on the back of the book, near the bottom. There's no point trying to be different and placing it somewhere else or in a weird shape, because all that will do is confuse buyers and sellers, and prevent them from quickly scanning your book for information.

For example, here is a recent book I illustrated, with the barcode placed on the back.


You might also include the ISBN number without the barcode inside the book, on the page with your copyright and legal information, like this;


So that's it! You know know everything there is to know about ISBN numbers and hopefully, you're armed with enough information to start buying yours. If you have any more tips about ISBNs, or would like to ask a questions about them, please feel free to leave a comment and I'll get back to you.


Wednesday 18 April 2018

5 tips to writing books for children (With words by published children's author, Carol Baker!)


It isn't as easy as A B C. Writing for children is a lot more challenging then a lot of people would expect.

Children demand engaging, thought provoking and linguistically interesting books that capture their hearts and light up their imagination. As a writer is it difficult to know when your story is too simple or too complicated for your chosen age range, or even if your writing will appeal to your target age range.

I spoke to Carol Baker, a teacher with a passion for English Grammar who recently commissioned me to illustrate her own children's book; Armored Armadillo to Zippy Zebra – An alliterative anthology of animals

With Carol’s professional advice, I have compiled these 5 most important tips to writing for children.


Don’t preach or lecture

It’s tempting to put wholesome, life lessons into your book, especially if your story has a moral that is revealed at the end. But children know when they are being taught a lesson; and it’s too much like school. They spend much of their day being told what to do and taught how to behave, so young readers will shy away from books like this.

Try and avoid writing your ‘moral’ at the end of the story in an obvious way, and instead use the character and the story to show how the person has learned and changed. For example a book about a boy who never shares his toys may end with the boy learning to share, but instead of writing this as the boy’s Mum telling him, ‘Sharing is kind and the right thing to do, so you should always share,’ how about the boy finds out for himself that sharing makes him more popular and he prefers the friendships he makes more than his toys, leaving them discarded at the end of the book as he runs off to play with his friends?

Books that have good lessons hidden below the surface are much more likely to be fun to read, and children are smart enough to learn that this behaviour can benefit them too. When you find yourself preaching, ask yourself; how can I imply this without saying it outright?

Carol’s career as a teacher prepared her for this.

My passion has always been English grammar, and I particularly enjoyed teaching fairy tales and folk tales to children.  Valuable life lessons and English grammar structures can be learned from these simple stories which many of my ESL (English as a Second Language) students grasped unknowingly as they began reading.  A good teacher can make learning enjoyable.

Although “Armored Armadillo to Zippy Zebra, An Alliterative Anthology of Animals” can be read for pure enjoyment, many parents and teachers will appreciate the ways they can apply the book as a teaching tool. 


Write from a child’s point of view

A great practice session for this is to listen in on children having a conversation without adults. How do they ask questions? How do they put their sentences together? Children have a unique way of interacting with the world around them, and they will find it difficult to read a book that is written in an adult environment. 

A child will not only understand your story better, but they will also relate to your characters much more if they talk like them and think like them. Here’s a great example.

An adult might say; ‘Where does the sun go after sunset?’
A child might say; ‘Where does the sun sleep at night?’

If you are writing what you think a child should hear – stop right there. Go back and write as if you are immersed in the world of that child. Tables and chairs tower over your head, adults eat strange things and you can’t understand why pouring mud onto the living room carpet is so bad.


Don’t treat your readers like little kids

'But they ARE little kids!' I hear you exclaim.

Think about it. What child likes being told they’re too little and inexperienced? Young children love to think they’re all grown up. When they are reading (or being read to) they want to feel like they are powerful, respected and that the person telling the story understands them.

Children are a lot more intelligent and perceptive then most adults give them credit for. It’s a fine balance between giving them the opportunity to piece a story together themselves, working out something that they might not understand at first, and still keeping it simple enough that they can still follow the plot without getting frustrated and abandoning it. Carol Baker does this by providing some easy to pronounce, well-known words with new, more difficult ones that children can learn.

I knew I was going to choose an animal for each letter of the alphabet as the basis of my book, but it took me two years to decide what vehicle to use for showcasing these animals.  Should I make it funny or factual?  Should I make it rhyming?  What age readers should I target?  When I decided to give each animal an alliterative adjective, I saw alliteration as my vehicle.


Kid’s LOVE silly humour

While illustrating for Carol Baker, I slipped a pair of underpants into an illustration. Carol wasn’t keen on the idea and removed them to the dismay of her Granddaughter. After seeing her young test audience giggle so much when they saw the clothing, Carol decided to put the underpants back in.


It’s not just underpants. Snot, poop, bogies – if it’s gross and inappropriate, young kids will love it! Adults on the other hand, will have no idea what is so funny about it.

Don’t be scared to throw in a few rude situations in both your writing and the accompanying illustrations. If you’re unsure, test them out on a willing young subject and see if they laugh. You’ll be surprised!


Say more with fewer words

Children’s books typically have fewer words to play with; so don’t waste them. Make every word count by eliminating any words that aren’t essential to the story and use outstanding, interesting words that add to the atmosphere you are trying to create.

Carol Baker does this perfectly in her book. Without going over ten words per page, every single word she uses gives something to the reader so that the sound they make when spoken are pleasant to hear and conjure up the exact image that is needed to understand the meaning.

Tell the reader the important bits, and use the illustrations to show them the rest.


 Carol's inspiration for her book came in a dream one night and a few years later she's selling copies of her book on Amazon and Barnes & Noble as well as at local bookstores and events. 

My book showcases entertaining and educational alliterative descriptions of real animals with beautifully detailed and colorful illustrations which include an “I Spy” feature that can be enjoyed by both children and adults.
I’m very pleased with this project!  I have a brilliant illustrator, and I am proud of my alliterative descriptions.


You can your copy of Armored Armadillo to Zippy Zebra – An alliterative anthology of animals here; www.amazon.com


If you’re interested in getting a quote for illustrations for your book, you can email me to find out more! izzybean@izzybean.co.uk

Sunday 1 April 2018

Step by step guide to self publishing with Ingram Spark - Uploading your files

This blog is the second part of a two part blog. If you would like to follow from the beginning, you can read part one here; Preparing your Ingram Spark account

In this blog post, I will go through a step by step process to preparing your files and uploading them to Ingram Spark's website ready to publish and distribute.

Before you can upload your files, you need to make sure that they are formatted correctly. Ingram Spark have strict specifications that you need to abide by, so if you are not familiar with formatting and design, it might be best to hire a professional to ensure you end up with files that will be accepted. If you have hired an illustrator, it's worth asking to see if they offer this as part of the illustration package.

Ingram Spark expects you to upload your book as two files; the exterior as one file, and your full interior as the other. The process is similar, but not identical, depending on what kind of book you are publishing but I am going to assume you are uploading a full colour book with pictures or illustrations and if your book is different you will still be able to follow the process. Let's start with the exterior file.

Exterior file

Your exterior file includes the front of your book, the back of your book and the spine. Depending on your personal preference, you might have a combination of text and illustrations. Your exterior should be one, continuous file that has the front of the book on the right and the back on the left. Here are the specifications that Ingram Spark requires;

- A PDF which is PDF/X-1a:2001 or PDF/X-3:2002 compliant
- CMYK
- At least 300 dpi
- A 100% black only barcode on a white box / background
- A 3mm bleed on all four sides
- A 6mm margin on all four sides

The size of the file is the front cover, plus the back cover, plus the spine. The spine size depends on many factors, such as how many pages it has, what kind of paper you use and what kind of cover you select. You can calculate this through Ingram Spark's spine calculator here; Ingram Spark - Spine calculator

Here is an example of one exterior file I created for a recent project;


Interior file

Here are the specifications that Ingram Spark requires;

- A PDF which is PDF/X-1a:2001 or PDF/X-3:2002 compliant
- Single page PDF only (all double spreads should be split)
- CMYK
- At least 300 dpi
- A 3mm bleed on three outer sides
- A 13mm margin on all four sides

If you have  9" tall by 6" wide book, this is how you work work out the bleed;

The size of the book in mm -  228.6mm x 152.4mm
WIDTH = Add 3mm bleed on the outer trim edge - 228.6mm x 155.4mm
HEIGHT = Add 3mm bleed on both the top and bottom outer trim edges - 234.6mm x 155.4mm

Below is an example of one page from an interior PDF that I created for a recent project. note that you can't tell where the bleed or trim end, as the illustration flows all the way to the end of the paper. The outer edge around the illustration contains little valuable information because that will risk being cut off when the book is manufactured.


Once you have the two files correctly formatted and ready to upload, login in your Ingram Spark account and navigate to your Dashboard by clicking on the tab at the top of the page. From here, click on the title of your book and you should see your metadata and information you have already filled in. Keep clicking on continue (checking the information is correct) until you get to the end, where you will see two sections to upload files; one for your interior and one for your exterior.


Uploading can take some time if you have a large book or high resolution files and I sometimes find the upload times out if you don't have a good enough internet connection. Once the file has finished uploading, you'll see a spinning wheel as the software automatically checks that the file meets their initial requirements. This is not human controlled, so if you receive any errors at all, read them carefully and double check you have calculated the exact size and trim.


Once your files have been accepted, you will be able to submit the book for review by an Ingram Spark employee and your work here is done. As long as you've followed the steps properly and met the requirements, you will have your files accepted and be able to distribute your book. Good luck!

If you found this guide helpful, please share it and let others know!


Step by step guide to self publishing with Ingram Spark - Preparing your account

*Please note, this guide was written in April of 2018. Ingram Spark constantly update their interface so your experience may vary*

New authors might notice there is very little free help when it comes to self publishing with Ingram Spark. The popular print-on-demand publisher is an excellent choice when it comes to ordering high quality print-on-demand books that can be distributed to over 39,000 vendors worldwide, but navigating the strict requests set out by the Amazon owned company leave many hiring a third party to deal with the company on their behalf which can be costly.

In this free guide, I'm going to share with you the steps I've learnt during my ten years of working with clients who choose to publish with Ingram Spark in the hopes that I might be able to make your journey to becoming a best selling author that little bit easier!

As an illustrator who offers this service, I work exclusively with children's books so this guide will involve publishing a children's picture book, but you can apply these steps to almost any kind of literature you would like to publish.

We will go through two main elements; 

preparing your account and uploading your files 

Because I'm going to discuss every step of the way in great detail, I have separated these elements into two sequential blogs for easy reading. This is the first blog.

Before you begin, there are a few things you should have ready.

ISBN numbers

You should have different ISBN numbers for each format of your book. 

For example, the book I am uploading in this guide is Carol Baker's 'A to Z, an Aliterative Anothology of Animals' and we will publish this as a hardback, a paperback and an ebook. Therefore we will need 3 separate ISBN numbers for each version. If you're unsure how to get an ISBN number you can check out our handy little guide here; All you need to know about ISBN numbers. 

Tax information

Depending on what country you live and work in, your tax laws will vary so it's a good idea to read up about what you need to be legal. Regardless of whether your book project is your main source of income or not, you should always be prepared to submit your tax information to avoid breaking the law.

Bank details

This is so Ingram Spark can pay you the royalties earned from your book. If you're trying to sell your book as a main job, you might want to setup a business bank account for these payments.

Now you are ready to start, so let's begin with...


CREATING AN INGRAM SPARK ACCOUNT

Initially, it can be daunting to fill in the information Ingram Spark asks for if you are unfamiliar with the terms they use, but it is relatively straight forward if you take your time.

- Visit www.ingramspark.com 
- Click on 'Create an account' in the top right hand corner
- Fill in your details
- At this point, Ingram Spark will send you an email to verify your email address. Login to your email and click on the link to verify, then visit the Ingram Spark website again to login with your newly verified email and password.
- Accept Ingram Spark's terms of use by clicking on 'I agree'
- Fill in the required information on the next screen.
- Setup a security question
- Read and sign the agreements (note, only two of these are actually required to continue)
- Click on 'finish setting up my account'
- Select a currency and add your bank details (if you wish to get paid through Paypal, you must select US DOLLARS at this screen and Paypal will convert any payments into your local currency)
- Add a bank card

Once you've finished setting up your financial information, you can move onto adding your book. Click on the tab which says; 'Dashboard' and from here, there is a button which says; 'Add a new title', click on this to open up this page.


Now you need to fill in the information about your book. I recommend taking your time to do this properly because once you have filled everything in, it is more confusing to go back and make changes.

You now need to select the format of your book to work on. Is it a physical print or ebook? If you offer both and you will distribute them at the same time, you can choose the combined option.


Then, you can fill in the main information about your book.

Title - The title of your book
Subtitle - The subtitle of your book, leave this blank if you don't have one
Language - The main language your book is written in
Short description - You can use the blurb from the back of your book
Keywords - Research some popular and relevant keywords relating to your book's subject
Series name and number - If your book is not part of a series, you can leave this blank
Edition description - Only fill this in if your book has different editions, different formats (such as paperback or hardback) are not included. Otherwise leave this blank
Full description - This would be an extension of the short description above. You can use a more in-depth discussion of what your book is about, similar to what you might send to a potential agent or publicist. 

Continue to the next step, where you see this screen;


Add any contributors you would like associated with your book, such as illustrators and co-authors then click on continue. Now you will see more boxes to fill in. It is important to fill these in honestly and accurately, because they will form the 'metadata' that is attached to your book. If your metadata is inaccurate it may mean that your target audience cannot find your book.

Imprint - This is defaulted to your business name, which is listed as the publisher data instead of 'Ingram Spark'. At first, your name might not appear because you are a new account, but you can continue as normal and come back to this in a couple of days to select your name.
Subject - Choose the main subject that your book is about, you can select more than one if you need to
Region - If your book includes a real place or country in the world, you can select it here
Thema - This is a global subject that is featured in your book
Audience - Choose the audience your book is targeted towards
Table of contents - If your book has a table of contents, you can write it here
Review Quotes - If your book has been reviewed positively before, you can write quotes from the reviews here


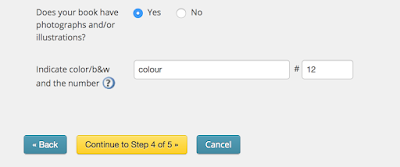
In the options at the bottom, tick yes if your book has illustrations or photographs included, and in the first box fill in either 'b&w' or 'colour' depending on what your illustrations or photos are. If you have a mix of both, write 'colour'. In the smaller box next to it, enter the number of illustrations or photos that are included.


Now we move onto adding more technical details about the format of the book itself. It is very important to know the exact details here, if you have an illustrator or designer handling your book, make sure what you enter here is what they have been using to prepare your files.


Trim size - This is what size your book will be AFTER printing
Interior colour and paper - This is the paper quality that the INSIDE of your book is printed on. Your preferences and budget will determine which one you choose. If you are unsure what the difference is, check out this great post about the options. 
Binding type - This is what the OUTSIDE of your book will look like. If you are unsure what the difference is, check out this great post about the options. 
Trim size - This is what size your book will be AFTER printing
Laminate type - This is what finish the cover of your book will have. If you are unsure what the difference is, check out this great post about the options. 
Page count - This is the number of actual pages (not sides of a page) your book has. All pages are counted so include any blank pages. Since one page has two sides, it should be an even number. 

The next page will include details about the pricing of your book. In the top box, you can enter the ISBN that is associated with this version of your book. There is an option to assign a non-distributable ISBN, but I would not recommend this unless you are making a book that you don't intend to sell or distribute.

In the following boxes, you can enter the retail price of your book for each country. You should have already thought carefully about how much you want your book to be, paying special attention to how much each print will cost and how much you need your profits to be. You'll notice a box called 'Global connect program.' This is Ingram Spark's program that allows publishers anywhere in the world to print and distribute your book. As long as you are happy to sell worldwide, you can tick this box and enter the price.

On this page you can also set rules about returns and wholesale discounts. Take note of the number that appears at the end of each column - this will be your earnings for each sale. If it is red, it is a negative balance and you won't be able to continue.

Publication date - This is the date your book will be published
On sale date - This date is the first date your book can be sold. You can leave this blank and it will automatically be the same as your publication date

At this point, you should see a prompt to start uploading your files, well done! Visit my next blog post to follow the steps to upload your files and continue using Ingram Spark to publish your book.

Next: Preparing and uploading your files