Friday 25 October 2013

Step by Step HALLOWEEN DRACULA VAMPIRE MONSTER! With Free colouring sheet for kids!

I've been posting these halloween guides all week, and today it's the turn of DRACULA!

All you need is a pen and paper - or a computer and mouse. It's not too difficult and it's easy to personalise if you want to be creative too!

And there's a FREE downloadable colouring sheet for kids at the bottom of this post!

DRAWING DRACULA - STEP BY STEP GUIDE

To start with, make a shape like this;

And another one, exactly opposite. They want to be as near symmetrical as possible, and the same size!

Then, draw this strange shape. This is the most difficult part, I promise!


And as before, draw it's mirror image opposite. All these shapes should connect and create one shape - the face!


Next, add this line and curve as above. Try to end it about 1/5th of the way down from the top, and in the centre of the face.


Do the same on the other side, making sure they meet in the middle!


Now we'll be adding ears. You can draw any shape ears you like, pointy ones work very well for Dracula. It's good to keep them symmetrical.


His nose, again, can be customised to create your own look, but pointy, long and thin are always a winner.


Next, we add the eyebrows. Have them meet in the middle, but not touching - you can leave a little gap. Arch them high in the middle for that menacing, evil effect!


At either side of the nose, draw small curves like this...


... then connect them with a menacing smile!


Add a little curve under that smile to give him a bottom lip!


Next, draw a long line downwards from the chin, and flick it outwards at the end.


Do the same on the other side too


Then, find where the very bottom of the nose is, and starting from the cheek besides it, draw a long curve, stopping at about the same length as his chin.


From this curve, draw another curve (not quite so curvy!) inwards, but stop before you get to his neck!

Apply the same to the other side, and you're nearly there!


Add two little beady eyes underneath those eyebrows you drew earlier. 


Now we can add some details to the inside of the ears... but wait! 
We're forgetting the most important bit!!


The fangs! Draw these nice and big, with sharp points on the end! 
He wouldn't be Dracula without them.


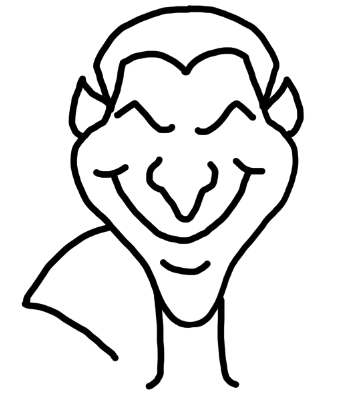
And there you have it! A sinister vampire cartoon of your very own!

Add some colour and share him with the world! Or me... at izzybeanillustrations@gmail.com


And as promised, here is a downloadable colouring in sheet for the kids, little and big! Just right click on this massive image below, 'SAVE AS' then print onto A4 paper.

See you next time!


Tuesday 22 October 2013

Step by Step HALLOWEEN FRANKENSTEIN MONSTER! With Free colouring sheet for kids!

Yesterday I posted a step by step guide to drawing your very own halloween bat, today, it's Frankenstein's monster!

If you missed the bat, you can find that here.

All you need is a pen and paper - or a computer and mouse. It's not too difficult and it's easy to personalise if you want to be creative too!

And for a FREE colouring sheet, scroll to the bottom of this post! (If you can afford to miss the drawing guide!)

DRAWING A FRANKENSTEIN'S MONSTER - STEP BY STEP GUIDE

We begin with this shape;

It's not exactly a curve, nor is it square; but somewhere in-between. 

Next, the same shape, but upside down!

Make sure they're touching and the bottom one fits into the top.


At the point where these shapes cross, draw some bent circles peeking out. These will be the ears - so if you want big ears, make them bigger! I went for little ears.


Next add two lines coming from the very bottom of those ears. The lines should not be straight down, but widen outwards.


In the dead-center, between the ears, add a nose! I drew two small dots, then a circle connecting them. Leave out the bottom of the circle.

To add a chin, draw a semi-circle over the bottom of the face. You should erase the bottom of the face so that it looks like the picture above.

Now draw a ( bracket shape on the left of the face, and a ) bracket shape on the right.

Connect these brackets with a curve - and you have a smile!

An extra, smaller curve under the smile gives him a bottom lip.


Now for the hair - here you can use your imagination and make it as long, curly, spiky or wavy as you like!

We want an L shape on it's side to make the monster's spooky forehead


And the opposite on the other side - it's good to keep faces symmetrical!


Above each L shape you just drew, draw some eyebrows - these are slightly arched


Let's get up close and add some eyes! Two little dots right above the nostrils look great - but you can play around with placement and see what looks best!


We're getting close! But there are still some important things to add yet!

Draw a small 3 in the left ear (your left, not his!) and a E in the right ear.


Halfway down his neck, underneath his ears, draw a small rectangle like this...


... and then join that to the neck with two lines like this!


Once you do that on both sides... ta daa! Your monster is complete! Mary Shelley would be proud!

Add some colour, and share your creation with the world!


Thanks for reading, don't forget to watch this blog for more halloween how-tos all this week until the 31st!

As promised, below is the FREE colouring sheet for any little monsters who like to get messy this halloween. Simply right click the huge picture and 'SAVE AS' on your computer, then print the picture onto A4 paper!

And if you would like to share your monster, just email a picture to izzybeanillustrations@gmail.com

See you next time!


Monday 21 October 2013

Step by Step HALLOWEEN SPECIAL BAT! With Free colouring sheet for kids!

It's that time of year. The days get shorter, the evenings get darker, and the mornings get colder. If there's anything that can cheer us up, its halloween!

Halloween is one of my favourite holidays, and it's easy to see why! Fancy dress, horror, sweets and pumpkins - you'd be crazy to miss it!

To celebrate, this week leading up to October 31st I'll be giving you some step by step tutorials on drawing some of the most popular halloween friends. All you need is a pencil and some paper, or a computer and a mouse! What are you waiting for?

And if you don't feel like drawing, I've provided some home-made colouring sheets ready to download, print and colour in yourself! Give them to your kids, it's a great halloween game! 

*Scroll down to the bottom for the colouring sheets*

DRAWING A BAT - STEP BY STEP GUIDE


To begin with, draw a nice, fat circle. Don't worry about it being perfect, the best circles are never perfectly round.


Now add another, slightly bigger and fatter circle, underneath it. Make the circles overlap slightly. 

This will be the bat's head and body!


Now we move onto the wings. Draw two curved lines, starting where the circles overlap and ending high above the circles.


Now draw two more curved lines, heading back down. Keep them going outwards as well as down!


From the bottom of your lines, draw some humps that connect to the circle which is our body. Don't think too much about this, just use an M shape over and over until you're connected. 

It's starting to look like a bat now!


Add some little hands and feet to your bat. 
The hands go at the top tip of the wings, the feet are underneath the bottom circle somewhere. 

Don't give up yet! We're just getting to the fun bit!


Next, we're working on the face! 


Add a nose - bats have little pig-like noses, so two little dots and an arch will do just fine.


Next comes the big grin! Add some fangs for that super-scary halloween effect.


At last but not least, two beady eyes!


Once you've finished the face, it really will look like a bat! 
Now you can add some of the finer details, you can add as much, or as little detail as you like. 
Be imaginative!


Ta daa! Your bat is complete! 

You can change any of the instructions above to personalise your bat if you like, give him a fatter body, or smaller wings, or bigger eyes, etc

That's the beauty of drawing - let your imagination go wild!

After you've finished, be sure to add some halloween themed colours and show your bat off!


If you drew a bat based on this guide, please do send it and I'll add it to the blog!

For all those little hands that can't quite draw yet - here is a free HALLOWEEN BAT colouring sheet. 

(To download, just right click this huge image below and 'SAVE AS' on your computer - then print it out on A4 paper and get to work!)


Share it with your friends, school or club - and feel free to share it with me too!

You can email completed bats and bat colouring sheets to; izzybeanillustrations@gmail.com

Everyone who sends a completed bat picture will get a special mention on this blog!


NEXT TIME....

Keep your eye out for the next halloween-themed drawing guide... FRANKENSTEINS MONSTER!


Monday 30 September 2013

The Adventures of Alex!


I recently finished a project working with Rich Twilley from Roughy Toys to illustrate a beautiful book for a great cause. The project deserved more than just a passing mention, so this blog post is to tell you a little bit about Roughy Toys, and what they do! I think you'll be impressed.

Roughy Toys is a company who believe the building blocks of learning start very early and begin with play. Their unique stuffed chimp, Alex, is not your average toy! For every one purchased, one gets sent to a child in need somewhere in the world - bring the joy of play to children who need it most.


You can visit the official website at www.roughytoys.com and find out all about them.

For me, Alex's journey started out in sketches - it took a few tries to get him looking perfect but once we did his adventures truly started!


The story of Alex is an ebook available now - it's a fantastic story about an adventure in a magical hot air balloon - and about how Alex comes to visit children around the world. 

The book is FREE to download on the iPad and only $0.99 on the Amazon Kindle! 


But here's the best bit! You can help Alex reach those children who need him so much, and get your very own Alex!

There's an Indiegogo campaign - for those who aren't sure what that is, the Roughy Toys team are taking contributions towards a goal, in order to put Alex into production! They've already teamed with Toy Industry Foundation to donate amongst a network of over 1,000+ charities worldwide.


Starting at just $5, there's a whole range of donation packages including the toy, shirts and more. Head on over and take a look, read their story and watch their video - and donate!


You can also like them on Facebook!


I am proud to have been part of Alex and the Roughy Toys campaign - now you can too!


Monday 16 September 2013

Sifting through the jargon; Ebook and digital publishing words and what they mean

Sifting through the jargon; 

Ebook and digital publishing words and what they mean

Weather you're a writer looking to venture into the digital ebook world, or an illustrator who has been asked to illustrate an ebook for someone else - the jargon can sometimes be confusing.


In my years of illustrating I have learned a lot about ebooks, how they are made and what terms to use. I now find myself using these words without much thought - but for those who are new to this language I have compiled a list of commonly used words, and decided to share them here with a short and simple explanation for each one - some of these may be pretty obvious, but you might just learn something new!


Author - the person who has written the book

Indie author - an author whose work is published either by themselves (self publishing) or a small, independent publisher rather than one of the 'big' companies

Illustrator - the artist who has provided pictures for the book if needed

Editor - an editor usually reviews the book or script and corrects any errors such as text, spelling, grammar, flow and so on

Ebook - an electronic version of a book that can be read on a computer or handheld device (e-reader)

Enhanced ebook - ebooks that are accompanied by music, audio files, animation and other added effects

Ebook reader - an e-book reader, also called an e-book device or e-reader, is an electronic device that is designed for the purpose of reading digital books - such as a kindle, iPad, Nook, etc

Script - the written text, sometimes refferred to as the 'manuscript'

Self publishing - publishing independently at your own expense

epub - short for 'electronic publication' - it is an open standard format for ebooks. It has reflowable content and the files have the extension .epub

mobi - a 'mobipocket' ebook file that is used by popular ebook readers such as the Amazon Kindle

Reflowable content - content that can 'adapt' to which ever device it is being read on. So, for example, text may flow into allocated space or wrap around an image to look and read better when the device has different screen dimensions

Fixed format - the opposite to reflowable - the content does not change from how it was originally intended. PDF files are fixed format

Calibre - calibre is a free computer software application that organizes, saves and manages e-books, supporting a variety of formats

PDF - a portable document file, it is a very popular way of sending documents and displaying ebooks

Android - google's operating system designed for smartphones and tablet computers

Hyperlink - a link from a file or document to another location or file, typically activated by clicking on a highlighted word, web address or image on the screen - taking you to a website. An example of a hyperlink is shown below;

I'm a hyperlink! Click me!

ibooks author - iBooks Author (iBA) is an e-book authoring application by Apple. Documents created with iBooks Author may be published to the Apple iBooks Bookstore. iBooks Author is available free of charge and a popular choice for many ebook authors.

iBookstore - an ebook application by apple where ebooks can be purchased and sold

iOS - iOS is Apple's mobile operating system. It is currently used on iPhones, iPods and iPads

Kindle - the Amazon Kindle is a series of popular e-book readers designed and marketed by Amazon.com

kindle direct publishing - also known as KDP - Amazon's Kindle Direct Publishing allows you to self-publish your books and make them available on Kindle, iPad, iPhone, Android, Blackberry, Mac, and PC

kf8 - Amazons new format used on the Kindle Fire e-reader

Nook - a brand of e-reader developed by large book retailer Barnes & Noble, based on the Android platform

ISBN - the 'International Standard Book Number' is a unique numeric commercial book identifier code made from a number of digits. All books for commercial sale need an ISBN number which can be bought, or in some cases provided by the company publishing / distributing the ebook

RTF - a text file format used primarily by Microsoft products, such as Word and Office

URL - a Uniform Resource Locator used to specify addresses on the web, a URL for this blog would be; 
http://izzybeanillustration.blogspot.com

Cloud - a relatively new but popular invention, cloud computing, or 'The Cloud,' means storing and accessing data and programs over the Internet instead of your computer's hard drive

download / upload - downloading is transferring a file or files from one computer or the internet to your computer. Uploading is to send a file from your computer to the internet, or another computer

Adobe DRM - a 'digital rights management' format that allows publishers to restrict sharing and specify permission settings on eBook files they provide for sale

HTML - Hypertext Markup Language is a system for tagging and coding text files to achieve font, color, graphic, and hyperlink effects when published on the internet


I am aware there are plenty more terms associated with ebooks and digital publishing, but hopefully this little blog explained some of the most common for you. 

If there's anything you think I've missed that should really be on the list - please let me know and I can add it!


If you're interested or currently making an ebook - check out my handy guide;
 'Making an Illustrated ebook.'